Thursday, September 12, 2013

Lime curd


Lime curd might quite simply be the best thing I've ever eaten. Try it folded into softly whipped cream, spread as a layer on cakes or scones, used instead of jam on toast, or spooned into baked tart-let cases topped with meringue for little key lime pies...try it with Greek yogurt, choux pastry or just eat it off the spoon!

½ cup of lime juice and some zest – you will need plenty of limes as they are tiny.
50 g butter cut in cubes
1 cup sugar
2 eggs lightly beaten
a couple of drops of green colouring - optional

Put zest and juice in a saucepan, add the butter and sugar and stir until the butter has melted and the sugar is beginning to dissolve.
Add the eggs and whisk continuously over a gently heat until the egg is incorporated and the mixture thickens. About 10 minutes. Don’t let the mixture boil or the egg white will set in strings and you’ll have to strain it.
Lime curd isn’t lime green, its yellowish. If you want a more limey colour add a drop or two of green colouring.

Cool and store in a screw top jar in the fridge.
You can easily double the mixture if you have a surplus of limes.


Thursday, August 22, 2013

Pressure cooking for beginners

Pressure cooker tips for beginners

You don’t need all new recipes when you buy a pressure cooker. 

Many things you currently cook you can simply cook more quickly in a pressure cooker. Some things you love but don’t cook because they just take too long you can do very easily in the pressure cooker.

To adapt your existing recipes:

Don’t over fill the cooker. Don’t fill more than 1/3 full of pulses, ½ full of soups, stews, or rice or 2/3 full of solid foods such as large joints of meat. 

Don’t coat meat in seasoned flour before browning, instead thicken sauces at the end if needed, either with corn flour and water, or a mixture of butter and flour beaten together (Beurre Manie).

To make Beurre Manie mix 1 tbsp plain flour into 2 tbsp soft butter and blend well. When your sauce is cooked, and pressure is released remove the lid and whisk Beurre Manie into the mixture a little at a time, simmering until thickened.

For general cooking:
Allow a minimum of 250ml of liquid for the first 15 minutes and a further 125 ml for each additional ¼ hour.

Search for pressure cooking recipes that are similar to your recipe, for example look for a pressure cooker recipe for a beef casserole that uses the approximately the same amount of meat and veg as your regular recipe, then borrow the liquid quantity and cooking time. Try it and if it works then you have the “formula” for a pressure cooker casserole that suits your family.

The liquid can be anything that produces steam – water, stock, milk, beer, wine, tinned tomatoes, soups...

Cooking times are determined by the size of the piece not the quantity. 450g of spuds takes the same amount of time as 1.5 kg of spuds if they are all cut up the same size.

For large joints of meat the time is calculated by the weight – a 450g topside roast will require 250ml liquid and take 15 minutes, 1.5 kg topside roast will require 500ml liquid and will take 45 minutes.

If using canned soups or tinned tomatoes as sauce bases you may find they catch on the bottom as they are quite thick so add an additional ½ cup of water to the mixture.

Add thickening ingredients at the end.

A rough guide for timing pressure cooking: 

Pot Roast chicken – whole, 8 minutes per 450g, Brown first, stand bird on trivet

Portions or drumsticks – 10 minutes per 450g – brown first

Breast, boneless – 5 minutes per 450g

Chicken casserole -15 minutes + 5 minutes to thicken and adjust seasoning

Corned beef -20 minutes per 450g

Beef casserole with 750g diced beef and 375ml liquid + veg – 25 minutes

Lamb curry with 750g diced lamb and 375 ml liquid – 15 minutes

Meatball casserole with 750g meatballs – 8 minutes after browning


Monday, June 3, 2013

Butter Crust Apple Pie

Apple pie is a classic family dessert. To ensure you have crispy not soggy pastry on the bottom use a metal pie dish. Metal conducts the heat much more efficiently than your old china pie dish so will give a crispier result.


Serves 8 –10
500 g plain flour
275 g cold butter, cubed
approx ¼ cup cold water

For the filling
900 g approximately cooking apples, I use Ballarats
6 whole cloves
scant ½ cup sugar
Metal pie dish approx 25cm diameter and approx 5 cm deep

Preheat the oven to 200 °

In a bowl or processor rub the butter into the flour until it resembles fine bread crumbs. Add just enough cold water so that when you squeeze the dough it holds together. 

Turn it onto the bench and squeeze it into a big ball. Do not knead. Wrap in plastic and chill in the fridge for ½ an hour.
While the pastry is chilling peel, core and slice the apples. Don't worry if they begin to turn brown. 

When the pastry has chilled, roll 2/3 out to 5 mm thickness and line the tin leaving the extra pastry hanging over the edges.
Sprinkle a good handful of the sugar over the pastry lining the tin. Stir the remaining sugar into the sliced apple. Toss in the cloves then pile the sugary apple slices into the pastry case, piling it carefully so it doesn't spill over the side.

Roll the remaining pastry to a circle approx 5 mm thick and large enough to cover the top of the pie. Gently lay it over the filling and press firmly around the rim to seal the edges  Trim off the excess pastry with a serrated knife and crimp the sides using your fingers or press them with the tines of a fork to decorate.

Cut a cross in the top to allow steam to escape, and lift the pie dish onto a baking tray before placing in the oven. The tray will catch any juices that escape and will enable you to lift the hot pie from the oven without damaging the pastry edges. Bake for 45-50 minutes, until golden and crispy.

Serve warm or cold with cream, ice cream  or custard – or all 3

Wednesday, May 15, 2013

Under Pressure? - Pressure cooker tips for fast, flavourful food


I’d never used a pressure cooker until very recently and I expected it would be similar to slow cooking but the reality I happy to say is much much better.
  
The speed with which the food cooks means flavours are fresh and clean with no loss of integrity; and while there is some steam it is not accompanied by the “rest home on a muggy day” aroma that I associate with the slow cooker.
My Indian friends consider pressure cooker essential equipment and the boaties and Bach owners swear by them for augmenting a small kitchen with limited facilities such as on a boat. The pressure cooker is a star when it comes to cooking cheap cuts of meat, and producing tender results in a much shorter time than conventional cooking.

The old fashioned models with rattling weights, that belched steam or in some cases soup onto the kitchen ceiling are a thing of the past. Modern Pressure cooking is easy, safe, fast and an excellent way to make delicious fork tender food from very inexpensive ingredients.

Pressure cooking is ideal for casseroles, soups, stews, and other normally slow cooking dishes.  Most will be cooked in 1/3 of the regular cooking time.
Steamed puddings including traditional Christmas pudding cook in a fraction of the time –perfect when Christmas occurs in the most humid part of the year.
Risotto, rice pudding and custards are all good contenders for the pressure cooker as it is gentle won’t damage the delicate structures of these dishes.
Jams marmalade and chutney as well as poached and preserved fruits can be done in the pressure cooker

Pulses and legumes cook quickly and can be prepared in bulk for freezing and virtually any meat or vegetable can be cooked; either under pressure, or simply using the pot as a saucepan.

Pressure cookers have two pressure levels and two release methods. Generally delicate or tender foods will be cooked under the more gentle pressure and finished quickly using the “quick release” method which releases the pressure in under a minute; you can also use the quick release if you want to check on the recipe, add ingredients or stir.

The higher pressure is used for meats, pulses etc and the “natural pressure release” method gives the ingredients time to relax and cook more gently for a further 15 or so minutes after the heat is turned off.

Pre steaming is referred to in many pressure cooker books; this term refers to using the pot without any pressure then changing to the pressurised lid for the remainder of a dish.
Pre steaming is needed to activate raising agents in puddings and dough before the cooking commences or to soften the outer layers of ingredients such as beans or lentils, so don’t skip it.
There are many comprehensive guides for cooking times online so if converting a recipe to use in a pressure cooker, look for one that has similar ingredients and adapt the cooking times to your recipe, with a bit of trial and error you’ll be able to get the hang of timings quite easily.
Always Always Always use a timer.

Tuesday, February 12, 2013

Scallop and Prawn Risotto - affordable luxury for 2


Romantic dinner at home – Scallop and prawn risotto

For busy working couples watching the pennies a romantic dinner at home is nice affordable alternative to a pricy night out or outrageously priced red roses.
This luxurious risotto is quick to make, is special enough for it to feel like an occasion and doesn’t require slaving over a hot stove for hours so you have time to enjoy the meal and company. Just add a salad and some crusty bread and if you budget will allow any then you can wine match with any Bubbly or serve with a glass of Sauvignon Blanc, pinot Gris or a chardonnay.   

Serves 2-3
Cost $19.51
2 ½ cups chicken stock – use good quality liquid stock
1 tbsp olive oil
1 medium onion, finely chopped
1 clove garlic, crushed
½ med chilli, seeded and finely chopped
1 cup Arborio rice
½ cup white wine (optional)
12 scallops
8 – 10 prawns – frozen defrosted prawns are fine
Zest and juice of 1 large lemon
Handful of finely chopped Italian parsley
Salt and pepper


In a saucepan heat the stock to boiling then remove from heat and set aside.
In another large pan heat the oil and add the onion, garlic and chilli. Cook gently until soft, taking care not to let them brown.
Pour the rice into the pan and let it toast along with the onion and garlic for around 2-3 minutes.
Stir in the wine if using, and allow it to evaporate - around 1 -2 minutes.
Add the stock a ladleful at a time, the rice will absorb the stock but don’t let it dry out or it will stick. Keep and eye on it and add more as needed until all the stock has all been added. Stir occasionally to ensure it doesn’t stick.
Cover the pan and simmer gently for 15 minutes then add the seafood, cover again and cook for a further 5 minutes or until the prawns are pink and the scallops just cooked.
Turn off the heat and stir in the parsley lemon juice and zest.  Season to taste with salt and pepper.

Cooks tips: if you want you can add a drizzle of cream at the end and stir in before serving.

Valentines Raspberry shortcake ice cream sandwiches


For the Semi Fredo ice cream 

300 ml cream
150 ml berry flavoured yoghurt
1 ½ cups raspberries to make ½ cup raspberry puree – frozen are fine
½ cup caster sugar
2 egg whites beaten to soft peaks                                                                                                                                                  

For the shortcakes: Makes approx 18 - allow 2 per person 

225g butter
125g sugar
350g flour
Pinch of salt

Raspberry jam for spreading

To make the ice-cream
Line a large spring form cake pan or Swiss roll pan with cling film.
Defrost the frozen raspberries then pulse them in a food processer. Pour the purred berries into a sieve set over a bowl and press the raspberry puree through a sieve to remove the seeds.
Whip the cream in a large bowl; fold in the yoghurt, caster sugar and beaten egg whites.
Lastly drizzle in the raspberry puree and ripple it through the mixture using the blade of a knife.
Pour the mixture into the lined pan and freeze.
While the Semi Fredo is freezing make the shortcakes

Preheat the oven to 150°C
Combine the sugar; flour and salt then cut the butter into small pieces and rub into the dry ingredients. Work it well with your hands until it becomes a smooth dough or place all the ingredients into a food processor and process till dough forms, you may still need to work it a little with your hands.
Roll the dough out till it is about 4 ml thick and use a heart shaped cookie cutter to cut the shortcakes.  Prick each shortcake with a fork and bake on a greased tray for around 15 minutes or until lightly golden. Remove from the tray and cool on a rack.

To assemble
Remove the semi fredo ice cream from the freezer so it can begin to soften. Heat your heart shaped cutter in hot water. Spread some raspberry jam onto one shortcake, cut an ice cream heart and place on top then top with another shortcake.

Monday, September 17, 2012

Fruit Mince

Fruit mince is excellent in Christmas mince pies, and a delicious addition to apple tarts, as stuffing for whole baked apples or mixed into cake and pudding batters for a fruity, spicy variation.

I have read some ridiculous stuff online about fruit mince/mould/food safety etc including steeping fruit in melted fat, cooking it, not using too many apples etc. 

Fruit mince is old fashioned preserve, is uncooked and if made properly looks after itself improving with age. I discussed risks etc with NZ food safety re preserves made in this manner and they have no concerns.And bloke said several colleagues happily eat fruit mince several years old as tastes so much better than freshly made - like wine.
Both sugar and alcohol are natural preservatives, dried fruit is full of sugar (fructose) + extra sugar, and a good slosh of booze. 
Like jams, the only real risks are mould, which occurs if there is too much water present. The mould isn’t hazardous, and within reason can be scraped off; or fermentation, which in jams ruins the flavour; but as alcohol is already present in fruit mince is likely to enhance it. It should be able to be stored for a year or more provided it hasn’t gone mouldy. 

3 cooking apples – granny smiths are ideal
450 g currants
450 g raisins
450 g sultanas
450 g brown sugar
125 g glace cherries
125 g mixed peel
2 oranges juice and zest
2 lemons juice and zest
250 g shredded suet –see cooks tips
150 g chopped blanched almonds
1 tsp cinnamon
2 tsp mixed spice
¼ tsp ground cloves
½ a nutmeg freshly grated
¾ cup brandy – extra for sampling when no one is looking

Approx 6-8 jars and lids – Place the jars in the oven and heat them to 120° for 15 minutes then leave them in the oven to cool. Place the lids in a small saucepan of water and simmer them gently for 5 minutes to sterilise them.

Cut the apples into quarters leaving the skins on, remove the cores and chop coarsely. Place the almonds and suet into the processor and pulse, so both are fine crumbs and turn into large bowl.
Place one third of the apple chunks in the processor with the raisins and process until minced, then turn them into the bowl, repeat using one third of the apples with the currants, and again with the sultanas. Then mince the cherries and mixed peel and add them to the bowl with all the other minced fruit. 

Add the brown sugar, zest and juice of the oranges and lemons and the spices. Reserve 3 tbsp of the brandy, and pour in the rest. Stir the mixture well so all the ingredients are well mixed.
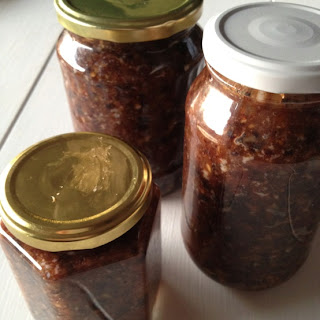
With tongs remove one of the jars from the oven, pack it full of fruit mince, and run a long flexible knife down the insides of the jar to release any air pockets. Pack the jar right to the top, don’t leave any head space –as this will allow room for mould to grow.

Spoon a teaspoon or two of the reserved brandy over the top. Use tongs to take a lid from the hot water and screw it in place. Continue with all remaining jars and mixture. Wash and dry the filled jars and store in a cool dark place – the bottom of the pantry is ideal – the mince will be usable after one month but improves with age.
Cooks tips:  Suet is hard beef fat taken from around the kidneys. It’s inclusion in fruit mince is likely a holdover from the original medieval recipes for Mincemeat which included actual meat. The fat enriches the fruit and makes it glossy. 

Shredded suet is sold in supermarkets as Shreddo here in NZ, in a margarine type tub; it is often with the oils. Once opened it should be stored in the fridge. Butter can be substituted and some people make Vegetarian fruit mince using non animal fats or none at all but I have not tested these alternatives.